
I grew up in maple tree country when I was young. We would drive by forests of maple trees, all lined with light blue tubes from tree to tree which I understood, from a young age, that was how pure maple syrup was made, and where all of the delicious maple products came from.
I dreamed of having property with maple trees one day, so I could do the same.
Well, we now have a small backyard farm; we have a maple tree and quite a few black walnut trees, and we tap them all each spring to make enough pure maple syrup and delicious walnut syrup for our family, and it is totally worth it.

Now, not having acres and acres of trees to tap, we didn't need the tubes running from tree to tree. Instead, we bore a small hole into each tree and hang buckets to collect the tree sap in, and then we boil it all down all at once when the trees stop pumping that sap.
Of course, it is a bit more complicated then that (but not by much). This is the best place to start though; you are first going to need to get the right maple sugaring supplies, and more importantly, make sure they all work together.
We are going to share our list of the supplies that you need, and the ones we are listing will all fit together.
After you get your supplies in, be sure to head to our next article to learn how to tap maple trees (feel free to bookmark it now for when you supplies come in) and we will take you through the steps.
These supplies will work for any tree you want to tap, just make sure you know that the tree you are planning to tap is safe to do so.
Ok, let's get into everything you need to tap a tree and make pure maple syrup!

Maple Syrup Supplies
Here are all of the supplies you need to tap your tree (maple tree, walnut tree or any other kind of tree). We will talk about each piece of equipment and why it is needed to make your pure maple syrup (or other kind of syrups!).
Before we begin, we thought we would share a quick video from The Farmers Cupboard YouTube channel of what we do in the backyard for tree tapping, so you have an idea of what to do:
Here we go!
SECTION 1: TREE TAPPING SUPPLIES
1. A Drill + The CORRECT Bit Set For Tree Tapping
This is the drill bit set we recommend grabbing with the drill we use
We highly recommend having a cordless drill for this as you will be walking around outside going from tree to tree, and there is nothing more annoying than dragging a cord around with you, let alone your extension cords.
Here is the drill and the proper drill bit set that we highly recommend, it is the one we use for tree tapping every year.
You will need a drill with a 7/16-inch or 5/16-inch bit to create the holes in the tree; these are the two sizes that every spile comes in (check what size your spile is so that it fits snugly into the hole you drill).
*The spiles we recommend next will work perfectly with this drill and bit set).
2. Maple Syrup Spiles (The "Taps")
See the spiles we recommend here
The spiles of the tree are what are known as the taps you will be putting in.
Traditionally, these were actually made with lead! Thankfully, things are made a bit more safely now.
Spiles are small spouts that are inserted into the holes in the tree. The sap flows from the tree and through the spile, and then either into the bucket or container that is attached to it.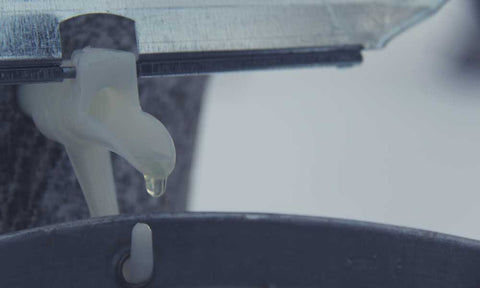
*After much research, it seems that it can be very difficult to find the proper spiles for tree tapping, online.
We are recommending these stainless steel tree tapping spiles from Amazon. They will work with a 7/16" drill bit. If you find your own somewhere, just make sure they are not "vintage" or "antique" (a.k.a. lead-based) and if they are plastic, they must be food-grade.
3. A Rubber Mallet
You will need a soft mallet to tap the spiles into your trees.
Having a rubber mallet will prevent you from tapping your spiles too hard and damaging them and the tree.
4. Maple Syrup Sap Buckets
See the buckets we recommend here
When tapping trees, you will need a container to collect the sap as it flows out of the spile. These buckets will work with the above-listed spiles. They will hang perfectly from the hook of the spiles with their handles and are strong enough to hold a bucket that full of sap.
Here's how ours look: (this is our walnut tree in the backyard last spring)
These are great 2 gallon sap buckets that are made from aluminum. You can purchase individually, or they have the option of getting 12 at a reduced cost.
These will last for years, but they do not come with the bucket lids for sap. Most don't, you'll have to get those separately.
5. Maple Syrup Bucket Lids
See the lids that go with the buckets above right here
Sap bucket lids are important as they keep debris from dropping into your sap collection (seeds, dirt, bird droppings, bugs, leaves, etc.) These lids will work with the spiles, buckets and drill bits we listed above.
Notes about the tree tapping supplies:
We recommend getting 1 spile and 1 bucket per tree (and always have a couple of extra spiles and several extra buckets on hand for changing filled buckets with new ones) as well as 1 drill/bit set and 1 rubber mallet for the entire job.
You will need many food grade containers to keep your sap in as these will need to be collected then boiled all at once.
To estimate how much sap per tree you will get is difficult, depending on your time of year and the temperature, the type of tree you have, etc. Just have many food grade buckets ready! The first year you do this will be the experimental year.
For us, we collect an average of 1 full sap bucket per day, per tree, and this lasts as long as the weather is encouraging the trees to pump the sap (1-2 weeks - cold nights, warm days).
SECTION 2: SAP COLLETING/STORAGE UNTIL READY TO BOIL
6. Food Grade Buckets To Collect Sap
See the ones we recommend here
You will need several of these to pour your collected sap into, to store somewhere cold so it doesn't go bad.
When you boil your sap, you will need to boil it all at once. We keep our buckets in the fridge and deep freeze when we are collecting until we have enough to make pure maple syrup.
*These buckets are essential; we suggest having many of them, because once they are full, you will need to boil whether or not the sap is still running and you are still collecting.
7. A Sap Filter
A sap filter can be used when you pour your collected sap from the tree buckets into the food grade storage buckets, or you can use it when you pour your sap from your storage buckets into your boiler system.
You can also filter your boiling syrup as well to get any last sediment out.
Here we are filtering it right from the maple syrup evaporator pan. The tap on the pan made filtering super easy as we could turn the flow off while it slowly filtered the sediment out:


These filter out any debris, pieces of wood, dirt particles and anything else that might makes its way into your sap.
SECTION 3: SAP BOILING
*For your sap boiling, you have two options.
- You can either boil it down over a full day/over several days in a pot on an outdoor boiler
or - You can get yourself a maple syrup evaporator pan for boiling down sap into pure maple syrup much quicker
The choice is totally up to you. They will both do the job, one will just do it faster and more efficiently.
Let's explore both options below:
8. A Large Pot (to go on an outdoor boiler)
Don't be fooled, you will have a ton of sap to boil down, even if you only have a few trees you are tapping. You will want a huge pot to boil your sap in.
The one we recommended above looks like the biggest pot we could find, it is 80 quarts (20 gallons). You may be able to find one in your local hardware store as well.
The bigger the better!
9. An Outdoor Gas Range
Here's the one we use | CHECK PRICE
When you are boiling down your sap, it takes hours. You 100% DO NOT want to do this indoors. The steam is intense and carries a sticky residue with it which will coat everything in your house.
The link above is the same outdoor gas range we use. We were originally boiling on our BBQ before, but this is SO much better and is highly recommended by us.
We also use this for all of our canning in the late summer as well. It's pretty handy and has optional attachments like a grill top, pizza oven and more if you want to take it to the beach or camping.
10. Maple Syrup Evaporator Pan
A maple syrup evaporator pan is specifically made for boiling down sap into pure maple syrup.
This one comes in many different sizes, and it is made with premium 22 gauge, mirror-finished 304 stainless steel (thickness: 1.5 mm); the outside is brushed, and the inside is a complete mirror designed for extreme durability.
They are also fully TIG welded to the highest food grade standards.
To heat it, firewood or charcoal can be used as fuel. You also can put it on the propane gas stove we recommended above.
Tree Tapping Video
Watch us as we go from tree tapping, to sap collecting, to boiling the sap down and making maple syrup, right in our backyard (oh, and please subscribe!)
Well we hope you found everything you need to start tapping your own trees and making beautiful syrups! We love eating our own pure maple syrup on so many homemade maple products foods like pancakes and crepes, in our salad dressings, sauces and more.
Here are some other articles you may be interested in reading:
Beekeeping Equipment List | How To Start
Pros and Cons for Beeswax Wraps
Did you like this article?
❤️ Here's how you can support our blog:
My name is Linnea and I am a backyard gardening enthusiast! Along with my husband and our two kids (and chickens, ducks, bees and our little dog). Our hobby - growing our own food and making our meals from scratch. My blog, The Farmers Cupboard, is the website that blossomed from that passion. I love every second I spend sharing our hobby with like minded backyard growers.
It's easy to support my blog, and it is so appreciated. Please SHARE an article somewhere, pin a photo to your Pinterest board, follow on any of our social medias or sign up for our newsletter! That's it!
These little things help our blog grow and allow us to continue doing what we love: growing good food and sharing what we learn.
PINTEREST PASSIONATE? We're opening up our cupboard to you!
Click on the pin below made just for you. It will bring you right to my little Pinterest community, where I would love for you to FOLLOW The Farmers Cupboard and see all of our gardening and backyard dream ideas!

Let's grow good things together!


6 BEST + RELIABLE Automatic Chicken Coop Doors for 2026


Here are our top choices of automatic coop doors.
Best Vacuum Sealer For Food | How To Properly Preserve


Compact, affordable and reliable vacuum sealer.


0 comments