
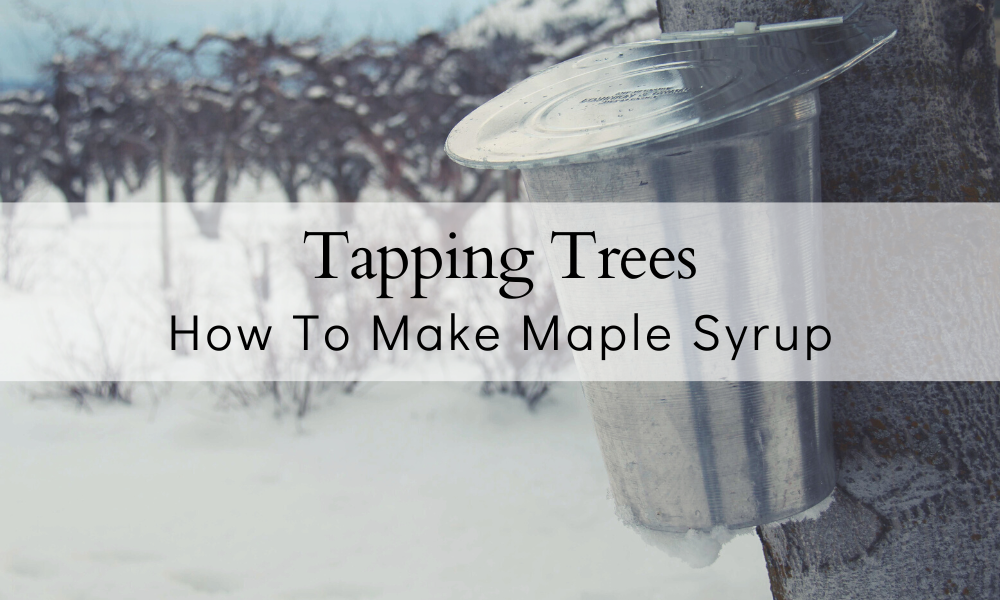
Maple syrup is a sweet, amber-colored syrup ranging from dark syrup to a very light color depending on the length of boiling time and the tree that is tapped.
Tapping a maple tree for syrup is a tradition that has been around for centuries, and it is a fun and rewarding activity that can be enjoyed by people of all ages.
You can only tap trees during a very short time in the early spring, but it does involve daily work of checking the sap, as your buckets will fill to the top daily and will need to be poured out.
But the reward is your own maple syrup, and that is something special. And once you try it, you will realize how amazing it is to tap trees collect your own sap for maple syrup.
And as the years go by, you will see your former tap hole and drill in a new spot to collect each year. (Just make sure to place your tap holes in different locations every year!)
Below, we are going to give you a step-by-step guide on tapping trees for syrup, including the tools and maple syrup supplies you will need, the best time of year to tap your trees, and the process of collecting and boiling sap so it can become sweet, rich maple syrup for your pancakes, crepes and other recipes.
Tapping trees for syrup is just a matter of drilling a tap hole in a proper tree and tapping it, collecting gallons of sap, and then bringing it to the boiling point so the water concentration reduces and you are left with pure maple syrup.
Before we start, it is important to note that not all trees are suitable for tapping. The best trees for syrup production are sugar maples (Acer saccharum), black maples (Acer nigrum), and red maples (Acer rubrum), but we also tap our own black walnut trees.
Here is a photo of a black walnut tree we tapped last year (you can see the walnuts on the ground):
Maple trees (and walnut trees) typically have a high sugar content in their sap, which makes for a sweeter maple syrup. You should also choose trees that are at least 12 inches in diameter and are healthy and mature.
You will see a mixture of us tapping our maple trees and walnut trees throughout this article. The same practices are used for either tree; the tools, supplies and instructions are interchangeable for each tree type.
I will let you know that we have a maple tree in our front yard that we tap every year, and it is not a sugar maple or a black or red maple. It does give us quite a bit of sap (and we actually blend it with our black walnut sap we tap from our backyard trees) but just make sure you know the trees you are tapping and whether or not they are suitable for syrup-making.
Here's a quick video of our own backyard tree tapping from The Farmers Cupboard YouTube channel so you can see what we will be talking about in this article:
Other popular choices include birch and walnut trees. This tree tapping article can be applied to these trees as well.
Ok, let's get started.

How To Tap Maple Trees For Syrup
To tap a maple tree, you will need the following tools and supplies (will link a shopping list below for where to purchase proper ones):
Tree Tapping Supplies
*Everything we recommend here will all work together in terms of sizing and fitting.
-
A drill and a proper drill bit set for it (we highly recommend this drill and set, it's the one we are using in the photos below. You will need a drill with a 7/16-inch or 5/16-inch bit to create the holes in the maple tree (check what size your spile is so that it fits snugly into the hole you drill).
*The drill bit set we suggested for your drill comes with both 5/16" and 7/16" which can both be hard to find for tree tapping. The spiles we recommend next require a drill hole size of 7/16". -
Spiles (or the taps): These are small spouts that are inserted into the holes in the tree. The sap flows through the spile and either into the bucket or container that is attached to it, or flows down the tube into the bucket on the ground.
*It can be very difficult to find the proper spiles for tree tapping online we found. We are recommending these stainless steel tree tapping spiles from Amazon. They will work with a 7/16" drill bit -
Buckets to hang off trees: You will need a container to collect the sap as it flows out of the spile. These buckets will work with the above-listed spiles.
-
Lids for your buckets: Lids are important as they keep debris from dropping into your sap collection (seeds, dirt, bird droppings, bugs, leaves, etc.) These lids will work with the spiles and buckets we listed above.
-
A rubber mallet: You will need a soft mallet to tap the spile into the tree.
-
Food grade buckets: You will need several of these to pour your collected sap into to store somewhere cold so it doesn't go bad. When you boil your sap, you will need to boil it all at once. We keep our buckets in the fridge and deep freeze when we are collecting until we have enough to make syrup.
*These buckets are essential; we suggest having many of them, because once they are full, you will need to boil whether or not the sap is still running and you are still collecting. You may also want to clear out a fridge or freezer to keep these in once they are full of sap! -
Maple Filter: You will need to filter your sap before boiling it down.
-
A very large pot for boiling: You will want a huge pot to boil your sap down in. This looks like the biggest pot we could find, it is 80 quarts (20 gallons). You may be able to find one in your local hardware store as well. The bigger the better!
-
OPTIONAL: A tree tap kit for maple syrup: Here is a kit that includes 3 buckets, 3 lids, 3 spiles, the drill bit and some cheesecloth for filtering. You will have to see which is best for you, buying this kit or purchasing separately. It all depends on what you need.
-
Outdoor Gas Range: When boiling sap, it takes hours. You do not want to do this indoors. This is the outdoor gas range we now use. We were doing it on our BBQ before, but this is much better and is highly recommended by us.
We recommend getting 1 spile and 1 bucket per tree (and always have a couple of extra spiles and several extra buckets on hand for changing filled buckets with new ones) as well as 1 drill/bit and 1 rubber mallet for the entire job. You will need many food grade containers to keep your sap in.
To estimate how much sap per tree you will get is difficult, depending on your time of year and the temperature, the type of tree you have, etc. Just have many food grade buckets ready! The first year you do this will be the experimental year.
Now that you have all of your tools and supplies ready, it is time to start tapping the tree as the first step to making maple syrup. Here is a step-by-step guide on how to do it:
How To Tap Your Trees For Maple Syrup
1. Knowing the right time of year to tap trees:
The best time to tap maple trees for syrup is almost between the seasons of winter and spring. You will want to watch for when your nights are still below freezing, but the days are warming up to above freezing temperatures (plus 5C or 41F, or higher). This is when the trees are waking up and are pumping the sap to where the leaves will grow, but at night the sap goes back down the trunk and into the roots. It is this pumping system that happens only at this time of year where we are able to collect the sap.
2. Identify the right tree for tapping:
As mentioned earlier, not all trees are suitable for tapping. Look for a sugar maple, black maple, or red maple that is at least 12 inches in diameter and looks healthy and mature. You can also find yourself a black walnut or do further tree research, that is up to you.
3. Find the right spot on the tree:
The best place to tap a tree is on the south or west side, as these sides receive the most sunlight and warmth. Look for a spot on the tree that is at least 4 feet off the ground and has a smooth, unblemished bark.
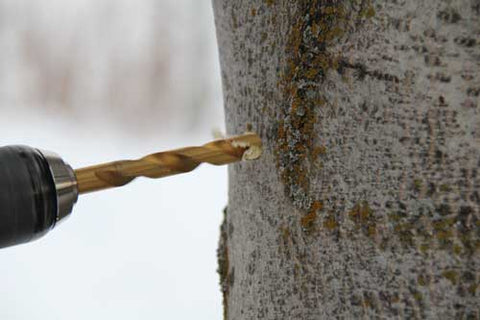
4. Drill the hole in the tree:
Using your drill and the 7/16-inch or 5/16-inch bit, create a hole in the tree about 2 inches deep.
Be sure to drill the hole at a slight upward angle to help the sap flow out more easily.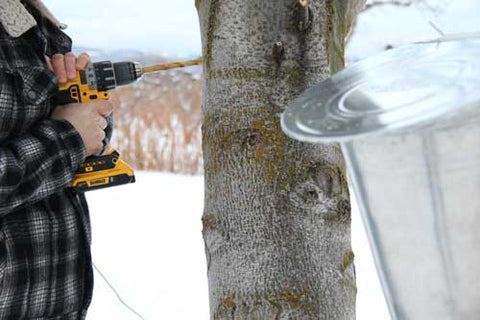
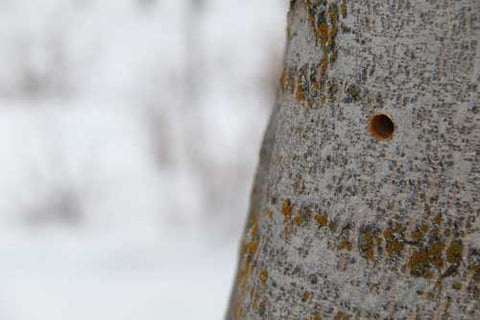
5. Tap the spile into the hole:
Once the hole is drilled, tap the spile into the hole using a mallet. Be sure to tap it in firmly, but not so hard that you damage the tree. It should fit quite snug in the hole.
*This is why it is important to purchase your spiles and drill bit together so they are the same size.
You will see sap start running immediately after you drill your hole!
6. Attach the bucket or container:
Once the spile is in place, attach the bucket or container to the bottom of the spile using a clip or wire. Be sure to position the bucket or container so that it is level with the ground.
Next, put the lid on your sap bucket to keep debris from falling in.

7. Check the tree regularly:
Depending on the weather, it may take anywhere from a few days to a week for the sap to start flowing. Be sure to check the tree regularly and empty the bucket or container as needed.
We find that as soon as the temperatures start alternating between freezing at night and warm in the days, the sap flow increases quickly and the buckets will need to be checked daily, if not twice a day.
8. Collect the sap:
As the sap starts to flow, you will need to collect it and pour it into food grade buckets or containers. Be sure to collect the sap as soon as possible to prevent it from spoiling. Then, store these food grade buckets of sap collected in the fridge or freezer.
If you are unable to collect the sap right away, be sure to cover the bucket or container to prevent debris from falling into it.
It is also important that you keep your collected sap cold until you are ready to boil it.
We keep as many buckets in the fridge as we can, and once it is full, we freeze the rest in our deep freeze until boiling time. You will need to do one big all day boil so it doesn't really work to boil just little portions at a time.
9. Filter the sap:
Once you have collected the sap, it is important to filter it to remove any debris or particles. You can use a fine-mesh strainer or cheesecloth to do this, or purchase a filter.
10. Boil the sap:
Now it is time to turn the sugar maple sap into maple syrup. To do this, you will need to boil sap over a fire or on a stove.
Sap boiling will take many hours once it is a rolling boil, and as this sap boils, you will need to continuously monitor the temperature and add more sap as needed, as the liquid level reduces.
The sap will turn into syrup when it reaches a temperature of about 219 degrees Fahrenheit.
NOTES ABOUT BOILING SAP: We really don't recommend boiling sap indoors. Your room will get very steamy once you have your sap at the boiling point, as you will need to continue to boil the sap until the water content reduces. We highly recommend you boil outside over a wood fire, or on a good gas range outdoor burner.
We have a really great propane double burner that we now use to do this and it works extremely well. We also use this double burner for when we do tomato canning in the late summer as well (since it is also quite a messy job!)
*We would also like to add we use this outdoor stove now for our canning in the late summer and it packs up nicely for camping or if you are going to the beach and want to do some outdoor cooking!
See the double burner right here that we use (and recommend)
Tree Tapping Video
Watch us as we go from tree tapping, to sap collecting, to boiling the sap down and making maple syrup, right in our backyard (oh, and please subscribe!)
Filter and jar the syrup: Once the pure maple syrup is finished, you may decide to filter it again to remove any impurities or sediment. We personally don't do this, but it is your own choice. You can do this by using a fine mesh strainer or your sap filters, but it will take a while since your syrup is now thicker.
Once the syrup cools and is ready, you can jar it in clean, sterilized containers. Be sure to label the containers with the date and type of maple syrup, and keep them in the fridge.
In sum...
Tapping maple trees, collecting maple sap (or other sap you know is safe) and making syrup is a fun and rewarding activity that can be enjoyed by people of all ages. With the right tools and supplies, and a bit of patience, you can turn the sap collection from a maple tree into delicious, homemade maple syrup!!
Whether you are an experienced syrup maker or a beginner, this can easily become a beloved family tradition every spring. Making syrup is also a really great skill to have, once you know how to make raw sap into your own syrup.
Here is the quick shopping list for everything you need for tapping trees.
TREE TAPPING SHOPPING LIST
Drill Bit Set to work with your taps
Spiles (that work with that size bit) These have a 3ft food grade tube so you can leave your collection buckets on the ground
Buckets (for hanging off the trees)
Lids (for tree buckets)
Food grade buckets (to store collected sap in until you are ready to boil)
Optional alternative: Tree Tap Kit
Here are some other questions people are asking about making your own maple syrup:
Is it hard to make your own maple syrup?
It can be a time-consuming and labor-intensive process to make your own finished syrup, and in our own opinion, is much better than store syrup (making your own food is always amazing).
It involves tapping maple trees to collect the sap, which is then boiled down to create the syrup. However, there is only a short amount of time you can collect sap from trees and then boil it, and it is absolutely worth the effort for the knowledge, experience and delicious product you get from it.
Does tree tapping harm the tree?
Tapping maple trees to collect sap for making maple syrup is generally considered to be a sustainable practice that does not harm the trees. Proper tapping techniques can help to minimize any potential negative effects on the trees.
Here are some best practices for tree tapping to ensure that the trees are not damaged:
- Only tap a healthy tree and healthy wood: Tapping should only be done on trees that are in good health and have at least a 12 inch tree diameter at chest height.
- Use sanitized taps and buckets: It is important to sanitize the taps and buckets to prevent the spread of disease from one tree to another.
- Follow proper tapping techniques: Taps should be inserted at a slight angle and at a depth of about 2 inches into the tree. The taps should be removed at the end of the tapping season, and always tap in a new spot every year.
Overall, as long as proper tapping techniques are followed, tapping maple trees to collect precious sap for making maple syrup should not cause harm to the trees.
Here are some other articles you may be interested in reading:
Beekeeping Equipment List | How To Start
Pros and Cons for Beeswax Wraps
Did you like this article?
❤️ Here's how you can support our blog:
My name is Linnea and I am a backyard gardening enthusiast! Along with my husband and our two kids (and chickens, ducks, bees and our little dog). Our hobby - growing our own food and making our meals from scratch. My blog, The Farmers Cupboard, is the website that blossomed from that passion. I love every second I spend sharing our hobby with like minded backyard growers.
It's easy to support my blog, and it is so appreciated. Please SHARE an article somewhere, pin a photo to your Pinterest board, follow on any of our social medias or sign up for our newsletter! That's it!
These little things help our blog grow and allow us to continue doing what we love: growing good food and sharing what we learn.
PINTEREST PASSIONATE? We're opening up our cupboard to you!
Click on the pin below made just for you. It will bring you right to my little Pinterest community, where I would love for you to FOLLOW The Farmers Cupboard and see all of our gardening and backyard dream ideas!

Let's grow good things together!


Best Vacuum Sealer For Food | How To Properly Preserve


Compact, affordable and reliable vacuum sealer.


0 comments